Browse through our comprehensive list of frequently asked questions where you can find answers to most of your queries.
TVR is a Tribrid Video Recorder, which can support 2MP HD Cameras along with iP-HD Cameras as well in a mixed mode. The Tribrid is a combination support of 1MP HD + 2MP HD + iP-HD. Go for this type of TVR if you are going to connect 1MP or 2MP HD Cameras which is suitable in the value range.
QVR is a Quadbrid Video Recorder supports up to 5MP HD Cameras along with iP-HD Cameras as well in a mixed mode. The Quadbrid is a combination support starting from 1MP to 5MP HD + iP-HD. Go for this type if you need better clarity in 2MP or 5MP HD Cameras and to combine a few iP-HD Cameras as well. This is the most selling product in iV-Pro.
XVR is a Hexabrid Video Recorder supports up to 8MP HD Cameras along with iP-HD Cameras as well in a mixed mode. The Hexabrid is a combination support starting from 1MP to 8MP HD + iP-HD. Go for this type if you need the best performance for your 5MP and 8MP HD Cameras. This is the best option with no compromise in clarity and is the top performance series.
OVR is a Octabird Video Recorder supports up to 8MP Realtime HD Cameras along with iP-HD Cameras as well in a mixed mode. The Octabrid is the top series and should be used if 8MP 4K Cameras is your priority with realtime 4K performance.
NVR is a Network Video Recorder supports only iP-HD Cameras starting from 1MP to 12MP 4K. NVR is the most popular solution now days and if you need the best in clarity and performance, iP-HD is the future. The Network Series of Recorders are today the dominating products in bigger projects and the most selling product in iV-Pro.
Every Video Recorder comes with a Video Compression in the Encoding option. The H.265+ is the latest and it compresses your video that is saved in your hard disk in much lower size, so you end up getting more recording data. For Example:
A NVR with a H.265+ connected to a 5MP iP-HD Camera, would take 10-12 GB of space in the hard disk for 1 day of recording. Where as a H.264 or a H.265 would take 20-24 GB of space. So if you invested in a 1TB, you would get lesser days of recordings with a H.264, where as with a H.265 you would end up getting more space.
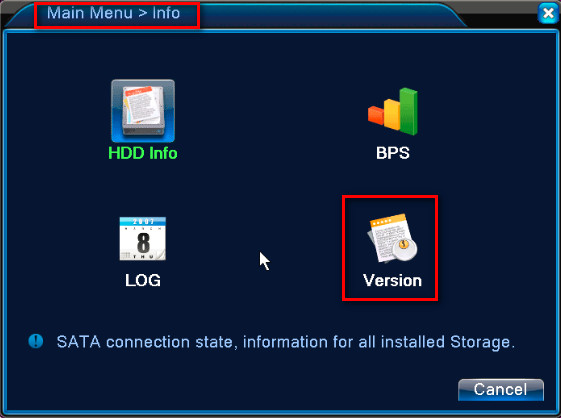
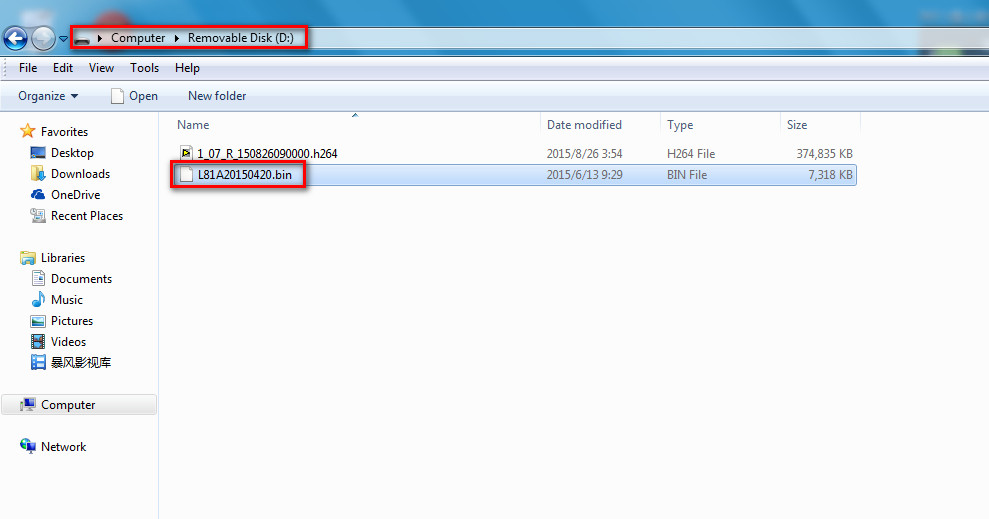
Check the model number of your Video Recorder and go to the download page – and click on Firmware – you can download the matching model number listed in the page and save it in a clean pen drive. Kindly note: Format your pen drive before loading the firmware file in it.
Please Note: Please check the correct Firmware model, you can find your firmware model in – Info – Version. There you will get the model number.
There are 2 methods to upgrade the firmware of DVR/NVR. We suggest you use method 1.
Here you can check the system’s current firmware build date. After upgrading, you can check if the build date changed.
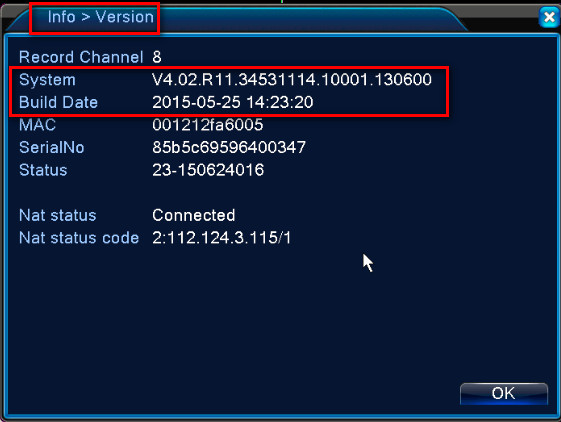
Here the model number of the Firmware is 34531114. Please remember the last 3 digits of the firmware model. Here it is 114. So checked the last 3 digits of the firmware in the download page and you can upgrade it by matching the last 3 digits of the firmware.
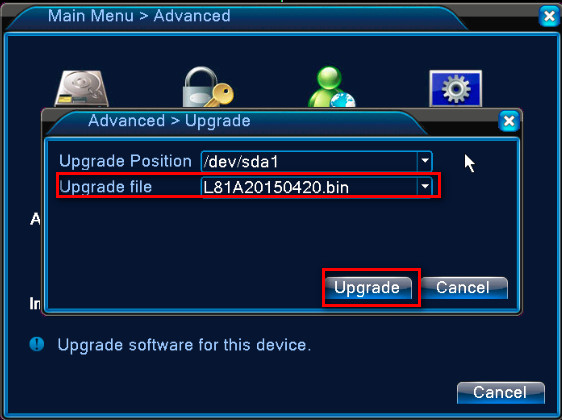
Method 1 :-
1. Copy the firmware file to a USB disk.
2. Insert USB hard drive to the USB port of DVR or NVR
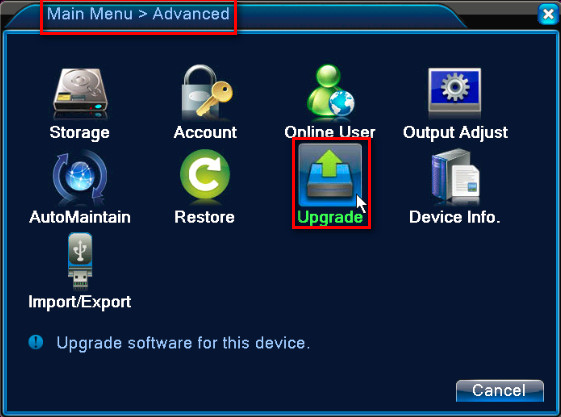
3. Go to the menu to upgrade.
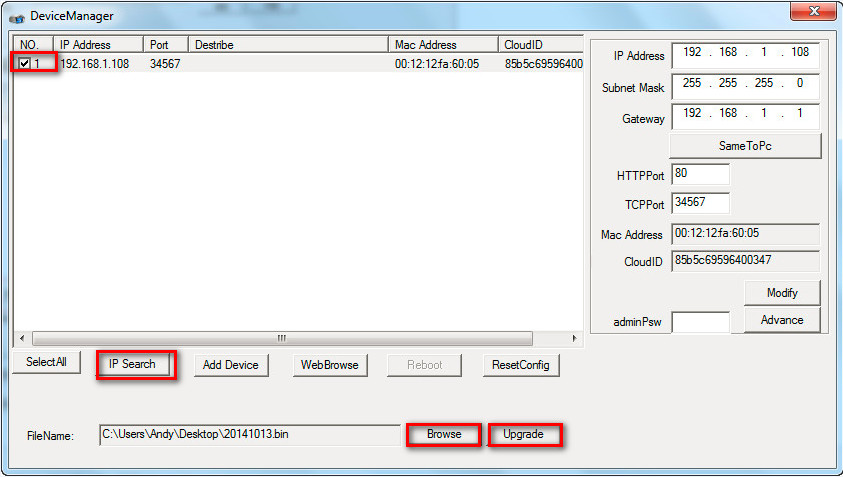
Method 2 :-
1. Connect your DVR/NVR to a router with a network cable.
2. Use a computer which is also connected to the same router as DVR/NVR is connected to install upgrading the firmware.
You can download the – Device Manager Tool from the Download – Software Tools
3. Run the software to upgrade.
If your recorder is not powering on, please try the steps below before contacting technical support.
See if your recorder is receiving power. To do so:
Verify the LED is on if your recorder has one.
If your recorder does not have an LED, check the Network port on the rear of the recorder. If the Network light is flashing green, the recorder is receiving power.
If you can hear the recorder’s fan, it is receiving power.
If the LED on the recorder is turned ON but you cannot see an image on your monitor, please refer to the Video Loss section of this article.
Check to ensure the outlet you have the recorder connected to is receiving power. Plug another device into the outlet, such as a lamp, to see if it works.
If the power adapter is connected to a surge protector/power strip or battery backup, then unplug it and connect the recorder directly to the wall outlet. This will help us identify if the issue is with the surge protector/power strip or the battery backup.
Ensure the recorder’s power switch is turned to ON.
NOTE: Not all recorders have a power switch.
Check to see if the recorder’s power adapter has gone bad. To do so:
Ensure you are using the power adapter that came with the recorder.
Check for any physical damage to the power adapter.
Look for signs of melting and or a burning smell.
Disconnect the recorder power adapter and replace it with a camera power adapter. If the camera power adapter powers on the recorder, then you may have a faulty recorder power adapter.
If your recorder is powered on, but you cannot see one or more connected cameras on your TV/Monitor or Smart Device, try the steps below.
Cannot See the Recorder on Your TV/Monitor
If you cannot see any cameras or the recorder menu on your TV/monitor, please:
Ensure the HDMI cable is connected from the recorder to your TV/Monitor.
Ensure you are tuned to the right HDMI input if your TV/Monitor has more than one.
Try replacing the HDMI cable, to see if you have a faulty cable.
Try connecting the recorder to another HDMI input or a 2nd TV/Monitor.
Ensure your TV/Monitor is a minimum of 1080p resolution. If not, please connect the recorder to a TV/Monitor that is.
Have Video Loss Only at Night
If you are experiencing video loss, flickering lines or fuzzy images on one or more cameras at night, this may be the result of a faulty camera power supply. Try connecting the camera to a different power supply at night to see if the camera image is corrected.
Have a Camera with a Purple/Pink Tint?
If you are experiencing a purple/pink tint with a camera, it is possible that your camera is defective and needs to be replaced. However, please check the following first:
Connect the bad camera to a known working channel on the back of the recorder, to see if the camera image improves. If the camera does not have a purple/pink tint when connected to the new channel, then the issue is not with the camera. If the camera still has an issue on the new channel, then the issue is the camera.
Connect a known working camera to the channel where the malfunctioning camera was. If this second camera displays a purple/pink tint, that indicates it may be an issue with that channel or channel’s settings. Please try resetting the Image settings for the channel. If that does not work, perform a Factory Reset. For more information on how to do this, kindly email or call us for phone technical support.
Video Loss On One or More Cameras
Check for Camera Compatibility
If you are having an issue with video loss with a camera that did not come with your initial system purchase, check if this camera is compatible with your system.
Check the Camera Connection
Make sure the camera is properly connected and you are using the right camera power supply.
Check the Video Format
In your recorder’s menu, ensure the video format is set to PAL. If the video format must be changed from NTSC to PAL, the recorder will restart.
Check the Camera’s Power Supply
Once you have checked the connection and camera settings, see if the camera is getting power. Go to the non-working camera, make sure it is plugged in and cover the front with your hands. If you see the red LED lights activate or hear the camera click, then it is getting power. If not, the problem could be the power source (power adapter or power splitter), the BNC video/power cable (BNC Wired DVRs) or the Ethernet cable (Wired NVRs).
Check the Power Splitter (BNC)
Bypass the power splitter for the camera and plug the non-working camera directly into the power supply without the splitter and check if the camera gets a signal. If so, you have isolated the issue to the power splitter.
NOTE: If a camera is using an extension cable (more than 60 ft.) ensure that the camera has an individual power adapter and is not connected to the splitter. The further a camera is from the recorder, the more power it requires to function.
Check the Recorder’s Channel Port (Wired BNC DVRs and Wired NVRs)
Plug the non-working camera into another channel port. If the camera starts working, then you likely have a bad channel port.
Check the Camera Cable (Wired BNC DVRs and Wired NVRs)
If you are not able to see the camera after connecting it to another channel, try replacing the camera cable with that of a working camera. If this corrects the issue, then you have isolated the problem to the camera cable.
If you are having an issue connecting your recorder to the Internet, please follow the troubleshooting measures below.
- Check the Cable Connection
Ensure the provided Ethernet cable is connected from the Ethernet port (on the rear of the recorder) to your router/network. - Check for a Damaged Ethernet Cable or ISP Issues
Unplug the Ethernet cable from your recorder and connect it to another device, such as a laptop, to check the cable condition.- If you have an Internet connection on your other device, this means that the Ethernet cable works. Plug the Ethernet cable back into the recorder.
- If you don’t have an Internet connection on the other device, either the cable is bad, or you are having a problem with your ISP (Internet Service Provider). Connect the recorder using a different Ethernet cable and check the network connection. If you are still having a problem, please contact your ISP.
NOTE: You may need to restart your recorder.
- Check your Network Settings and IP address
Check if the IP address of the recorder is different from the default one. Please refer to your product’s manual on our support site for information specific to your model. - Check your Network Connection Speeds
All iV-Pro products has a minimum recommended Internet connection speed, which you can find in your product’s specifications. As a general rule, we recommend a minimum of 2 Mbps upload speed for your recorder. Please note that your Internet connection is shared between all the networked devices you have in your home. So, just because you have high speed Internet, does not mean you have the requisite dedicated speed for your recorder. - Reset the System to Factory Default
NOTE: All current settings will be erased but your recording will remain on the HDD.
The exact steps to perform a factory reset varies by model. Please refer to your product’s manual on our support site for the exact steps needed.
NOTE: Recordings are saved on the Hard Disk Drive (HDD) of your recorder, so the first thing you must check is if the HDD is working properly.
If you are having an issue accessing your recordings or with playback, please check the following:
- Hard Drive Status
If your recorder has a pre-installed HDD, please check if it has been detected, is formatted and still has free space to save recordings. For more information on accessing the HDD screen on your recorder, please see your product’s manual on our support site. - Record Schedule
If you have already checked that your HDD is operational, but you are still having issues with playback, you need to check the recording schedule. By default, the recorder is set up to record when motion is detected. Check the recorder’s record schedule to make sure is set up as desired for each individual channel. For more information on accessing the HDD screen on your recorder, please see your product’s manual on our support site. - Time Settings
If you have already checked that your HDD is operational and the recording schedule is correct, but you are still having problems finding recordings, you may be having issues with your time settings. For example, you may be sure an event occurred at a specific time, but there is nothing recorded on your recorder at that time. In this case, the problem could be that the recorder date and time are wrong or not synchronized with the local time. For more information on correcting this issue, please contact your dealer or email us for support.
If you are having an issue exporting a recording, please check the following:
- The USB Flash Drive or External HDD you wish to export to must be formatted to FAT32.
- Please check the external storage device is connected to the USB port located on the back of the recorder.
- If you’re using an External HDD, ensure it is powered on using the provided power adapter.
- Once connected to the external storage, if you can’t export your video, your USB device may be in the wrong format or it may not be large enough for the videos you wish to export.
NOTE: There are many reasons why your recorder may be making a noise. Beeps are usually related to a firmware misconfiguration, while other noises may be the result of the HDD or fan failing. Please check the following:
- Disconnect your recorder from its power adapter. By doing this, you’ll eliminate all noise and you’ll be ready to proceed with the next steps.
- Once the recorder is disconnected, please unplug all connected cameras on the back of the device. We recommend doing this because buzzer alarms could be active and the motion sensor in one of the cameras could be activating it.
- With the cameras disconnected, turn your recorder back on and wait for it to load.
- Go to the recorder Main Menu (you may need to log in after this step).
- Click on the “General” tab and select the “Alarms” sub-tab.
NOTE: Our recorder menus vary by model. If these options do not look familiar, please refer to your product’s manual on our support site. - On the Alarms sub-tab, make sure the buzzer is OFF. You must review each channel individually.
- Connect all the cameras you unplugged before and check if they are all working.
- If the problem persists, and you are still hearing a noise, the issue is likely not tied to the firmware or your settings. You may be experiencing an HDD or fan failure.
To reset your recorder to the Factory Default settings follow the next steps:
NOTE: Your recorder’s menus and options may look different. If that is the case and you need additional help, please refer to your product’s manual on our support site for precise steps.
- Go to the recorder Main Menu. (you may need to log in after this step)
- Click on “Advanced” on the top left corner of the Main Menu.
- Click on “Maintain”
- On this screen locate the “Load Default”tab and click on it.
- On the next screen select the options you want to restore to Factory Default and then click “OK.” Your recorder will now reboot and be restored to default for the selected settings.
If you are not receiving an image from your camera, please try the following:
- Make sure that you are tuned to the right HDMI port on your TV / Monitor.
- Ensure the camera power supply or the adapter is plugged in to the power and that the outlet is plugged into the camera power cable.
NOTE: To check if the camera is receiving power, cover the light sensor with your hand. This causes the camera to activate Night Vision. If the camera is receiving power, the Night Vision LED’s in the camera will glow red. You may hear a clicking sound in some cameras that have an IR Cut Filter. - If you have a wired BNC camera, try bypassing the camera splitter and connecting the camera directly to the camera power adapter. If this powers on the camera, then you may have a bad splitter or the camera may not be receiving enough power and you will need to buy a separate camera power adapter for that specific camera.
- For WIRED cameras:
- Ensure the video / power cable (analog cameras) or Ethernet cable (IP cameras) is connected to the camera.
- Ensure the cable is properly connected to the recorder.
- Try connecting the cable to a different video input port to see if the camera appears on another channel. This will let you know if you have a bad channel port.
- If none of this works, try connecting the camera using a working camera’s cable. This will let you know if you have a bad camera cable that needs to be replaced.
- If you have extended the camera further out from the recorder using extension cables, you may need to power the camera with its own camera power adapter. When extended further out, it may not be receiving enough of a power draw to activate Night Vision.
- For Wi-Fi IP cameras:
- Ensure you are within the signal range for your product. This is usually capped at 300 ft. with line of sight to the recorder / router.
If your camera image is too bright or dark, please try the following:
- Adjust the brightness and contrast settings by accessing the Image Settings menu for your camera within the recorder’s main menu from a TV / Monitor. Exact steps with imagery are included in your product’s manual on our support site.
- If this doesn’t help, there may be an environmental factor affecting the camera image. Trying to relocate the camera or adjust the viewing angle.
- Ensure the camera is not pointed directly at a source of light, such as the sun or a spotlight, as this will negatively impact the camera image.
- If your camera has one, try adjusting the sunshade or tilting the camera more to where the sunshade blocks a portion of the light shining into the camera. This is not an option with all cameras.
- If the image is in black and white, this is likely because the camera is not receiving enough light to produce a color image. All of our cameras switch to black and white for Night Vision. Try reangling or repositioning the camera so that it draws on available light to produce a color image.
Yes. Please make sure your third-party NVR system is ONVIF compatible and the decoding ability is higher or equal to the camera. For example, if you have a iV-Pro 5MP iP-HD Camera, the decoding ability of your NVR needs to be 5MP at least. For HD Cameras – the default settings of iV-Pro are set at AHD. If your third party DVR or XVR is set at TVi or CVi, our iV-Pro cameras can change settings and work as: TVi, CVi, AHD, CVBS and XVi. iV-Pro cameras supports multiple formats.
For iP-HD Cameras – we recommend to have less than 100 meters from the POE Switch or the NVR.
If your iP-HD camera is too far and you need to extend the cat6 cable, we recommend having another switch after 90 meters and then you can further extend it 90 meters. If the length is too long, it is better to use Fiber optic cable and connect to the iV-Pro Fiber Switch for distances up to 1000 meters.
For HD Cameras – the video is supported up to 300 meters, if you are planning to extend the cable above 100 meters, it is recommended to use a heavy copper cable and if possible supply the power at the camera point. If there is no option to supply power at the camera point, it is better to use a heavy power supply with voltage adjustment, which can be adjusted from 12V to 15V. As the cable travels long, the voltage is dropped, so its better to increase the voltage for longer distances.
The Factory default ip address of all iV-Pro iP-HD Cameras are 192.168.1.10 with the gateway at 192.168.1.1
To change the cameras settings from AHD to TVi or CVi, you need to connect the camera first to the recorder that supports all the formats, like – iV-Pro Video Recorders support most formats, and once the camera is connected, you can right click on the main screen and click on Coaxial Control or XVi AHD Control, in the control panel you can click on the Cruise center button and enable the OSD Menu of the camera. You will have mutiple options to choose and you can change the settings to the format of your choice.
If your wireless camera frequently drops the connection, you may follow the troubleshooting tips listed below to solve the problem. There’re several possible causes for the problem:
Cause 1. The antennas of the camera are loose
Solution: Try to tightened the antennas or re-install them to see if they work.
Cause 2. The camera is too far away from the router.
The WiFi signal is strongly affected by the distance between the router and the camera. The WiFi connection will drop when the signal is too weak. (Please note that IP cameras usually need a stronger WiFi signal than laptops or cellphones.)
If the WiFi signal strength decreases to less than one bar, it means the camera is too far away from the router or there might be too many barriers (such as walls) in between. Try to move the camera closer to the router or mount the camera in position with better signals or use a signal amplifier to improve the signal.
Cause 3. The signal is weaken due to the interference from other wireless devices.
There might be WiFi signal interference if your camera is on the same WiFi channel with other wireless devices or services.
Yes. If you have the iV-Pro 4G Sim Card supported Camera, it also works as a wireless hotspot, so as you can connect other wireless cameras to its hotspot connection and watch all the 3 cameras on your iV-Pro 4G APP.
Yes. We have a few models that support SD Card recording with simultaneously recordings in the NVR as well. If someone only wants a single iP-HD Camera with excellent clarity and watch it only in its PC System, one can go for the SD Card camera and connect it to its router system, and also watch it in the PC as well as in the internet.
The recordings can also be watched on the PC System or in the Mobile APP without removing the memory card.
If your priority of watching the cameras is only on Mobile phones and tablets, wireless cameras which work on lan cable as well, would be better to go for.
If you would be watching the cameras on your TV live or on your computer system and also on Mobile phones and tablets, iP-HD Cameras is the best choice.
iP-HD Cameras have a better resolution starting from 3MP to 8MP 4K, suited for Monitors and Televisions and it is most handy for face recognition as well as number plate reading along with excellent clarity on any screen. Most corporate companies, retail joints, banks and industries go with iP-HD
Wireless Cameras have a lower resolution and since its working on wireless, the bandwidth can never replace a wired connection. Wireless cameras come in 2Mp to 5MP. These cameras are good for home and general use.
Once the installation is complete and you open the software – the default username is: admin and the password is admin.
Please note: The first time when you open the software, the username and password is already set. you only need to click – sign in, and you can leave the – remember password tick clicked, if you remove it, you need to put the password again.
Please check if your Video Recorder is connected to the LAN network of your router or if you are watching from cloud ID – please check if your internet is working at the Recorder side and in your PC System.
Other issues to look at:
Please check if your Video Recorder is powered on and the power led is on.
Please check if the LAN Cable is fixed correctly behind the Video Recorder.
Please check if your router is on and is connected to the Video Recorder.
After checking the above, still problem is not solved, kindly get in touch with us or your dealer for the solution.
Yes. iV-Pro’s new range of QVR-V2, XVR-V2 and NVR supports the new Face detection capture which makes it easy to watch older recordings.
Please note: Video recorders and the cameras has to be iV-Pro for it to support the face detection.
Once connected to the VMS Software – go to playback and click on the channel you want to watch the recording – tick it and select search. On the left side you will have file – time and face options. Select face and click search, you will get all the faces captured and the playback will start from there.
After you have logged in to the VMS Software – Click on Home – under settings – System Config – click on – show alarm tips. You can either enable it or disable it.
Yes you can choose the Tour Config option in the VMS software and select the cameras of your choice in single screen or 4 screens or multiple screens and save the tour option.
Once the tour option is saved. You can click on Live View and select the Tour icon below the screen and its options and click on it. The Cameras will play on the screen as per your choice selected in the touring option.
It is better to register and create an account in the iV-Pro APP to use all the functions of the APP, including face search.
There is a local login as well, to connect directly, but most features will not be available.
To know how to register and use the APP – Refer the Manual in the download section.
Please check if the camera icon is showing in Orange color – if yes, your Video Recorder is connected and the cameras on the recorder may not be connected.
If the camera icon is grey, it is not connected to the internet, you need to check the video recorder is connected to power and also the internet cable is connected to its port.
Yes, the live video what you are watching on your phone, can also be recorded on your phone if you need to keep the live footage recording simultaneously as well.
Please note: Your Recorder is already recording, if recording is enabled on it and you can still take the older recording and watch the playback on your phone.
Yes, you can enable Mobile Alarm Notification on your phone and you will get alarm messages with images saved in your alarm message – which is in the menu options of the APP.
Click on the Menu icon of the iV-Pro APP – and click on – Local Record – you will find all the videos you have recorded from your phone.
For the snapshot pictures – click on the Local Album – you will find all the images saved in it.
Please note: If you need to save the photos or the videos to your phone s library for later sharing. Click on the image or video and you will see a save icon, click on the icon to save the image or video to your phone gallery.
It is better to register and create an account in the iV-Pro 4G APP to use all the functions of the APP, including face search.
There is a local login as well, to connect directly, but most features will not be available.
To know how to register and use the APP – Refer the Manual in the download section.
If your wireless camera frequently drops the connection, you may follow the troubleshooting tips listed below to solve the problem. There’re several possible causes for the problem:
Cause 1. The antennas of the camera are loose
Solution: Try to tightened the antennas or re-install them to see if they work.
Cause 2. The camera is too far away from the router.
The WiFi signal is strongly affected by the distance between the router and the camera. The WiFi connection will drop when the signal is too weak. (Please note that IP cameras usually need a stronger WiFi signal than laptops or cellphones.)
If the WiFi signal strength decreases to less than one bar, it means the camera is too far away from the router or there might be too many barriers (such as walls) in between. Try to move the camera closer to the router or mount the camera in position with better signals or use a signal amplifier to improve the signal.
Cause 3. The signal is weaken due to the interference from other wireless devices.
There might be WiFi signal interference if your camera is on the same WiFi channel with other wireless devices or services.
To enable human detection with alarm alerts – click on the settings icon. Click on the Alarm Settings – Enable the Alarm trigger, if you need messages coming to your phone – click on – Alarm Push, if you need not be disturbed with the messages, but the alerts will be saved, click on the message ignore. This way you will get all the alerts saved in the app with no disturbance of messages beeping when there is any human movement.
Yes, you can click on the settings icon and go to network settings, you will find your new wireless router in the list of routers available. Click on it and set the password of your router, and the camera will start working with the new router.
Yes you can upgrade your Wireless Camera Storage. You need to check the memory card installed inside your camera, and need to replace it with the higher memory. If 7 days is what you get – then it must be a 32gb card, you can store up to 128GB Card which will give you up to 30 days.
If you have forgotten your password, there is a option near the password with a question mark, click on the question mark icon – it will ask for your safety questions which you had set, during the time of installation of the Video Recorder.
If you do not remember these, you will find : Key – mentioned below. Kindly email us the key to: info@ivpro.in or care@ivpro.in
Our team will email you the new password.
If you have forgotten the password of your APP Login, you can click on forget password and it will ask you for your email id which you had given during the time of registration. Please input the email id and the password reset option will be sent to you by email.
If you have forgotten the password of your APP Login, you can click on forget password and it will ask you for your email id which you had given during the time of registration. Please input the email id and the password reset option will be sent to you by email.
To reset your iV-Pro wireless camera password, you will have get to the camera and check the cable which has the OSD reset option in it. Make sure the power is on, and you need to hold the reset switch for 5 seconds and it will reset the camera to the default settings. If the cable is concealed and you cannot get it, you can also open the SD Card slot and click on the switch next to it, by holding it for 5 seconds and the camera will come to its factory default settings.
To know the default password of your camera, please email us the model number and we will send you the password. You may mail us at: info@ivpro.in or care@ivpro.in
Yes, you can create multiple users for your Video Recorder, and grant them permission for only the cameras you want them to watch. The user accounts will not have access to settings or make any changes to the recorder.
Go to System – User accounts – and you can create a new user, give them admin rights or user rights, also other options can be ticked, based on the cameras they have access to and the recordings.
- Design :
- ProKytes